In today ‘s technology landscape, clients expect a constant flow of updates. They also expect them to be seamlessly deployed.
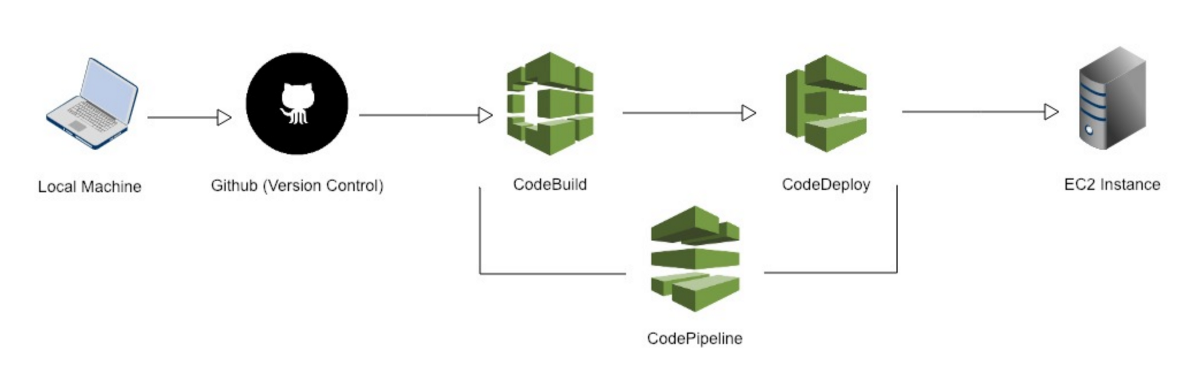
Automating build and deployment process in any project has many advantages when it comes to building application in today’s fast paced world. Also known as CI (Continuous Integration) and CD (Continuous Deployment) , this approach focuses teams to test and release quality products frequently and predictably from source code repository to production in an automated fashion.
We at Botsplash believe that having automated CI and CD can not only lead to faster feedback loops but also help to detect issues and fix them early as possible. That is why we are using AWS Code Suite to test, build and deploy our application. If you want to read more on how we evolved CI and CD, you can follow this link. In this blog, we will look at how to use AWS to integrate automated CI/CD using a simple ExpressJS project.
We will mainly be discussing the following steps:
- Create ExpressJS project
- Create IAM user
- Setup CodeBuild
- Setup CodePipeline
- Create EC2 instance
- Setup CodeDeploy
1. Create ExpressJS project
Our first step is to create a new project. Since we are focusing more on the\nCI/CD side of the project, let’s just bootstrap an ExpressJS project using the express-generator and call it ‘simple-express’.
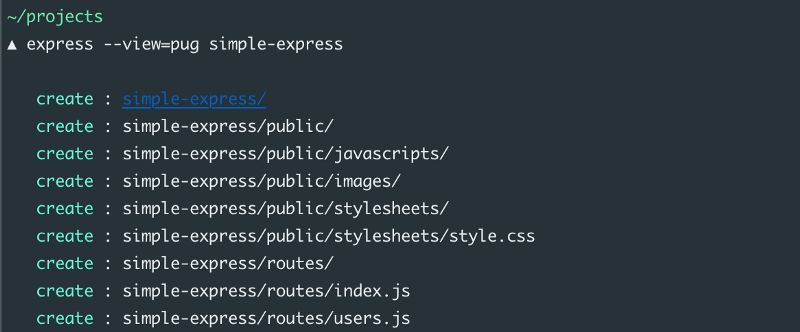
Generating new ExpressJS project with express-generator
Let’s install the dependencies and add a .gitignore file in the root directory to ignore node_modules folder.
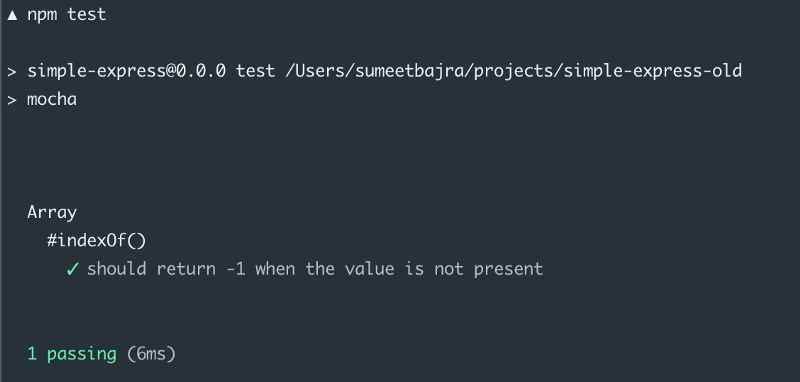
Let’s also add Mocha to our project. We will use it to test our code. Since we don’t have anything in our project yet, we’ll use a sample mocha test case as provided in Mocha’s website here. Follow the instructions provided and we should have a folder named ‘test’ and inside which contains ‘test.js’ file which contains the sample test case code. We also need to change our package.json file to include npm script to run our tests. Our package.json file’s script section should look something like this:
You can verify if the tests work by simply executing ‘npm test’ command in command line.
Now we need to create a Github repository and connect it to our repository. You can find all the instructions for it here. I have gone ahead and created new repository called ‘simple-express’ and pushed all the code to that repository.
We have our project ready now and we are ready to jump into CI/CD. You need to have an account with AWS. If you don’t have, go ahead and create a new account.
2. Create new IAM user
AWS Identity and Access Management (IAM) is a web service that helps you securely control access to AWS resources.
If you are not familiar with AWS IAM, you can find more details here.
Let’s create a new IAM user under which we will be building and deploying our project. To create new user, we need to go to the IAM page in our AWS console here and under users section, click on “Add user”.
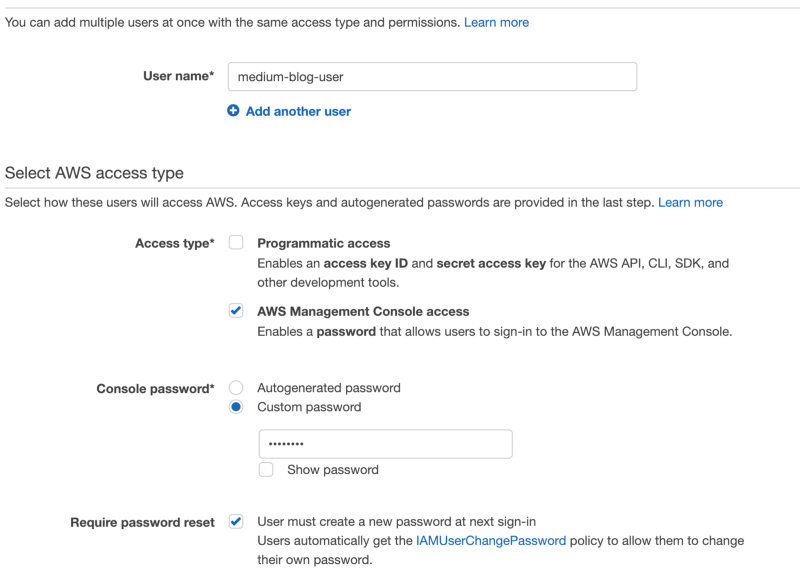
I have created a user with username “medium-blog-user” and a custom password and given AWS Management Console access. You can go ahead and give your own username and password.
Next, under permissions, Choose attach existing policies directly.

You should see a list of all the policies available. Go ahead and attach these policies to the user:
AmazonEC2FullAccess
AWSCodeDeployFullAccess
AWSCodePipelineFullAccess
AWSCodeBuildAdminAccess
IAMFullAccess
AmazonSNSReadOnlyAccess
After you are done, you will get your AWS console login url for the new user. Go ahead and login with that user since we will only be using that user account. You will be prompted to change your password on your first login. You should see your AWS Console dashboard.
3. Setup CodeBuild
AWS CodeBuild is a fully managed continuous integration service that compiles source code, runs tests, and produces software packages that are ready to deploy.
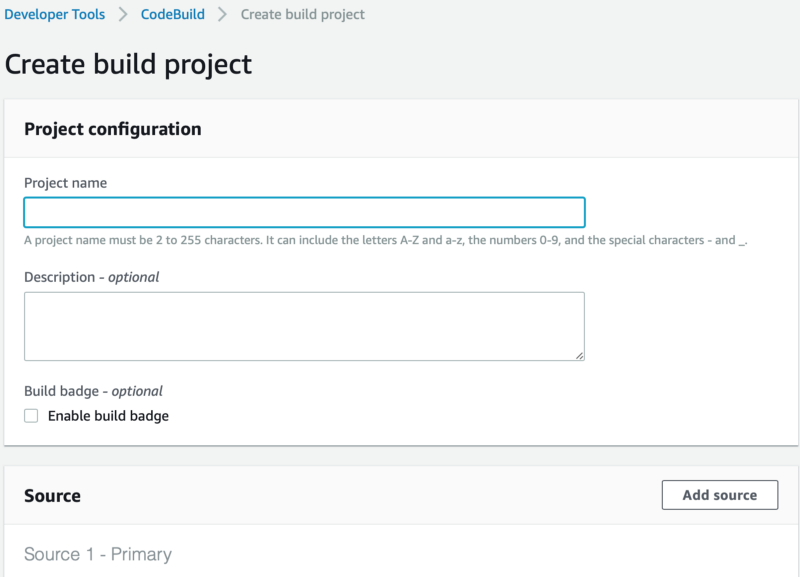
Let’s create a new CodeBuild project. In your AWS console, you can find CodeBuild under the services tab in the header section or you can directly go to CodeBuild using this link. Go to create a new project and you should see a form like this.
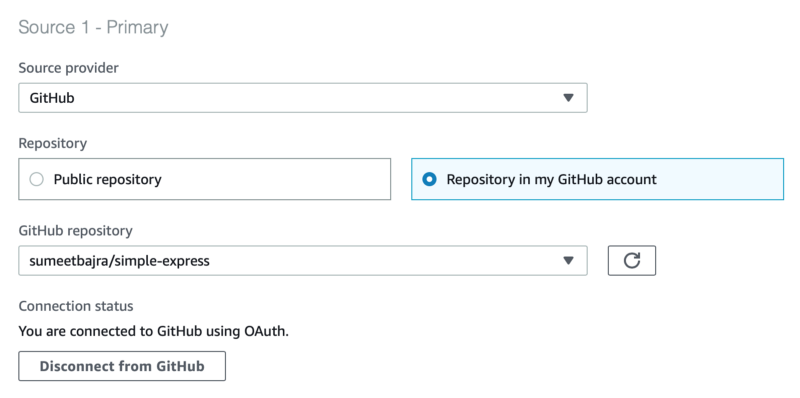
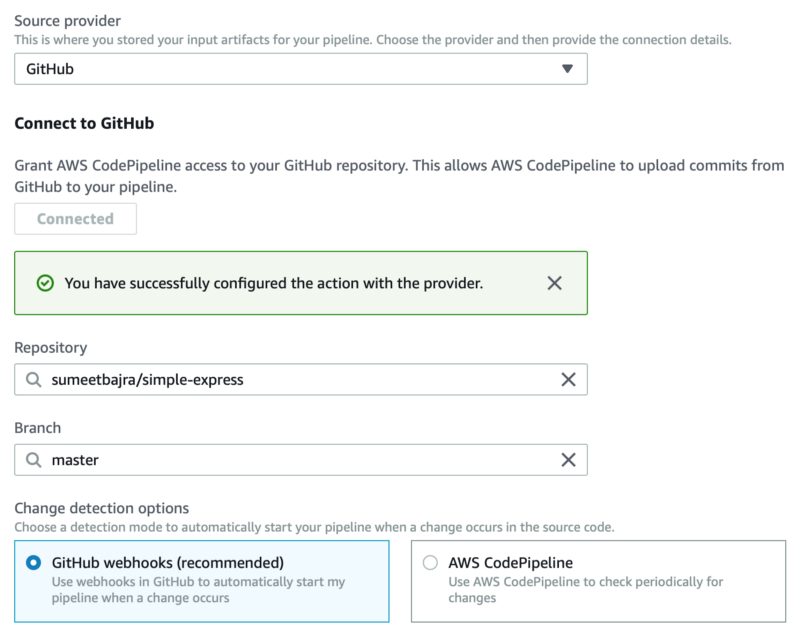
For project name, I am going with ‘simple-express-build’. Under source, you need to select Github as the source provider. You’ll need to connect your Github account to AWS CodeBuild using OAuth. After connecting it, select\n‘Repository in my Github account’ and select the repository we created earlier.
Next, under Environment, we can go with ‘Managed image’ and select ‘Ubuntu’ as our operating system and ‘Node.js’ as our runtime. You are free to choose any version of Node.js you want but we’ll go with v8. We’ll leave rest of Environment and Buildspec sections as it is. Select ‘Amazon S3’ for Artifacts type. You can either create a new bucket that will store our project builds here first or select an existing bucket. For Artifacts packaging, select Zip and then click on ‘Create build project’. You should now see your build project under ‘Build projects’.

We have setup our build project successfully but we still need a buildspec.yml file in order for our build to work.
A build spec is a collection of build commands and related settings, in YAML format, that AWS CodeBuild uses to run a build.
Let’s create a new buildspec.yml file in our root directory inside ‘simple-express’ folder. Our buildspec file will be a simple one but if you want to dig deep on to what it can do, you can find all the options available here. We are only concerned with pre_build and build phases for now. In pre_build phase, we will install all the npm packages required for the project to run and in build phase, we will execute our tests.
4. Setup CodePipeline
We have setup our build process and now we want AWS to build our project on every push to Github. We can do that with AWS CodePipeline.
AWS CodePipeline is a continuous integration and continuous delivery service for fast and reliable application and infrastructure updates. CodePipeline builds, tests, and deploys your code every time there is a code change, based on the release process models you define.
Just like we created new CodeDeploy project, we need to create new CodePipeline project. You can find CodePipeline from ‘Services’ header menu, from CodeBuild dashboard itself or using this link. Let’s go ahead and create new Pipeline using this form.
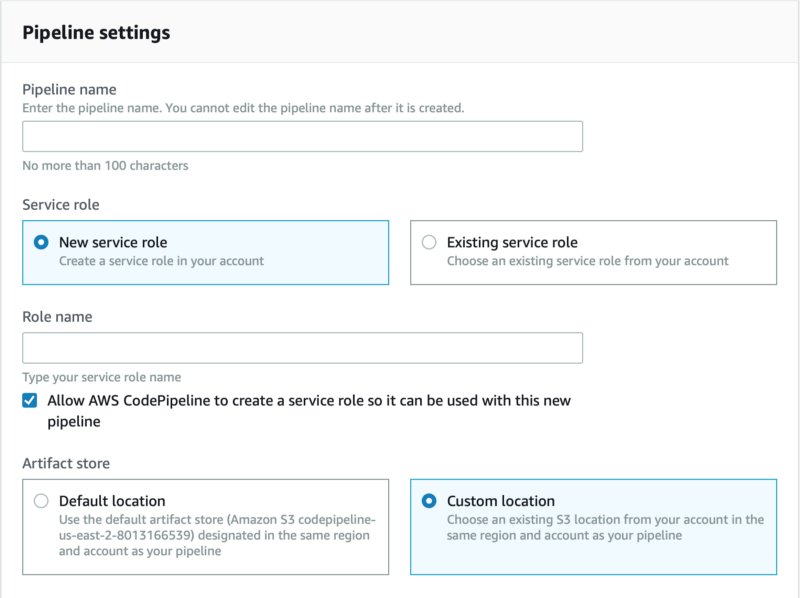
We’ll use ‘simple-express-pipeline’ as the name and create new service role. The name for it is autogenerated so let’s stick to it. For Artifact store, you can select Default location or select different bucket to store artifacts from CodePipeline.
Next step, let’s add source stage. We are pushing our code to Github and want to build the source from it directly so we’ll select Github as our source provider. We need to connect CodePipeline to your Github account just like we did for CodeBuild. We then need to select our Github project and the branch we want CodePipeline to watch. For change detection option, we’ll use Github webhooks.
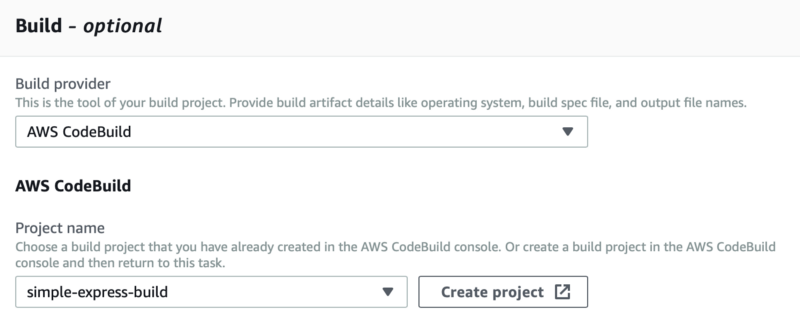
After source stage, we will get to the build stage. We just want to select Build provider as ‘AWS CodeBuild’ and select the build project that we had built earlier and click ‘Next’.
We now get to the Deploy stage which we will be setting up later so you can go ahead and skip this stage and then confirm all the changes to finish creating the CodePipeline project. You should see your pipeline that you created under 'Pipelines’ section. If you go to the pipeline that we just created, you should see that it starts fetching the code from Github repository and tries to build but fails at build stage. It is because we have not added our buildspec.yml file to the repository yet.
Let’s go ahead and add buildspec.yml file and push it to Github. Now you should see the statuses being changed to ‘In progress’ and then to ‘Succeeded’ along with the name of the commit and the commit id for both ‘Source’ and ‘Build’ stages.
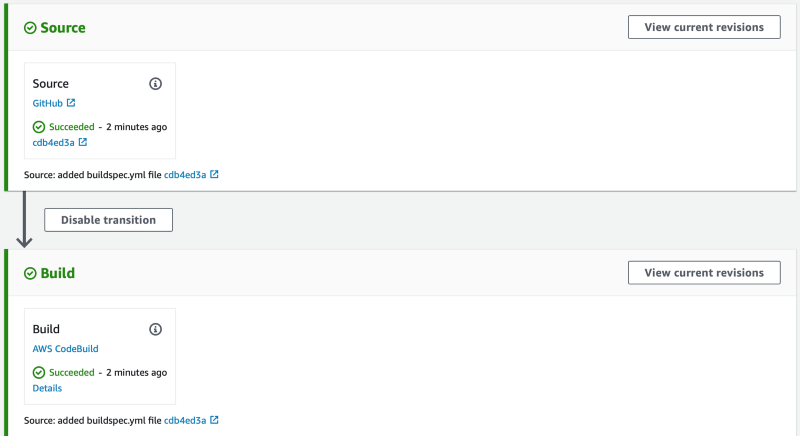
This means that we have successfully built our project and is stored in S3 bucket that we specified in a ZIP format. If the build process fails, we can see it here. Now, we should be able to create a build for our project on every commit push to the master branch.
So far, we’ve setup AWS to automatically build our project on every commit we push to our project. We now want to host our project to EC2 instance too and deploy the build to the server automatically if the build process is successful.
5. Creating EC2 instance
Under EC2 --> Instances, let’s launch a new instance where we will be hosting our simple-express project. Select ‘ **Ubuntu Server 18.04 LTS (HVM), SSD Volume Type ‘ **instance. Next, you can select any Instance Type but I will be choosing t2.micro instance.
Next, under Configure Instance, we need to give IAM role for the instance. We don’t have the role needed for using CodeDeploy to deploy the project to our instance. So let’s go ahead and create a new role.

You will be redirected to new page to create a role.

Select EC2 and click Next. You will need to attach permissions policies next. Select these policies and proceed to next page.
AmazonEC2RoleforSSM
AmazonEC2RoleforAWSCodeDeploy
AmazonS3ReadOnlyAccess
AmazonSSMReadOnlyAccess
CloudWatchAgentServerPolicy
You can add tags if you want but we will skip this step too and go to the review step. We can name this role as ‘simple-express-codedeploy-ec2’.

After creating the role, we need to attach it to our EC2 instance. We can close the IAM role tab and go back to the EC2 instance wizard where we left. In order to select the role we just created, we need to click the refresh button next to the IAM role dropdown. Our newly created role should appear now.

Next, let’s add a tag to our EC2 instance which will be used by CodeDeploy to know which servers we want it to deploy. You can create any tag you want. For simplicity, we’ll create a tag key called ‘server-name’ and have ‘simple-express’ as the value.

Next, under ‘Security Group’, let’s add new rule to allow access to HTTP 80 port. So let’s launch the server now. If you already have key file, you can use that or generate new one and download it. If you want to know more about the EC2 keys, you can find it here.
We are almost finished getting our deployment server ready. We will need to install ‘CodeDeploy Agent’ on our instance.
The AWS CodeDeploy agent is a software package that, when installed and configured on an instance, enables that instance to be used in AWS CodeDeploy deployments.
For this, we need to ssh into our server and execute these commands:
Since we are working from US East Ohio region, we’ll use https://aws-codedeploy-us-east-2.s3.amazonaws.com/latest/install/ for the source of CodeDeploy Agent. If you are working in different region, do change your region. You can find the bucket names for all the regions here.
We also need to setup our server to run our application. We need to install\nNodeJS, nginx and pm2. We can do that by executing these commands.
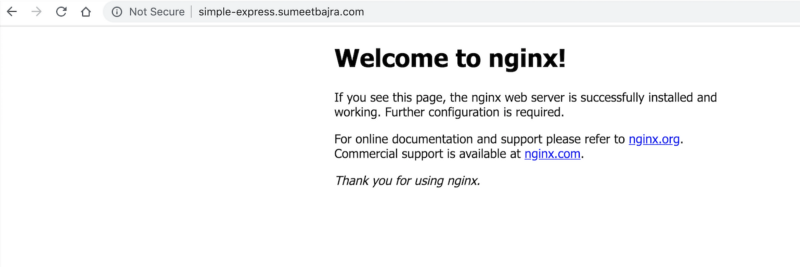
I have also gone ahead and reverse proxied the nginx server to redirect my custom domain name to the port (3000 in our case) in which the application is running. We can do that by adding new conf file called “simple-express.conf” inside /etc/nginx/conf.d directory. It specifies that all requests which match the location block (in this case the root / path) should be forwarded to port 3000 on localhost, where the Node.js app is running.
After this, just reload the nginx server using ‘sudo systemctl restart nginx’ command.
Note: I have created a new A Record and pointed to the IP address of the EC2 instance.
There you go, we have completed setting up our server. Right now, our domain should load the nginx default configuration page. We just need to tell CodeDeploy to deploy our project build to this server.
6. Setup CodeDeploy
AWS CodeDeploy is a fully managed deployment service that automates software deployments to a variety of compute services such as Amazon EC2, AWS Fargate, AWS Lambda, and your on-premises servers.
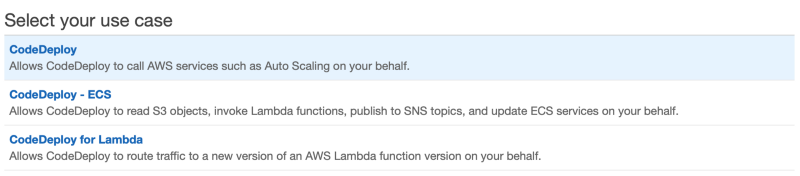
Let’s follow the same procedure to create new CodeDeploy as we did with CodeBuild and CodePipeline. We’ll create a new CodeDeploy project. We need to create a new IAM role for CodeDeploy at first so let’s start with that. Go to IAM Console and under Roles, we’ll create a new role. We’ll select ‘CodeDeploy’ and under use case, we’ll select ‘CodeDeploy’.
We don’t need to change any permission policies this time and can simply proceed to last step where we need to add name for the role. We can call it ‘simple-express-codedeploy’.

Now we have our role ready, we can move ahead with creating new CodeDeploy application. Click ‘Create Application’ in CodeDeploy, you should see a form like one below.
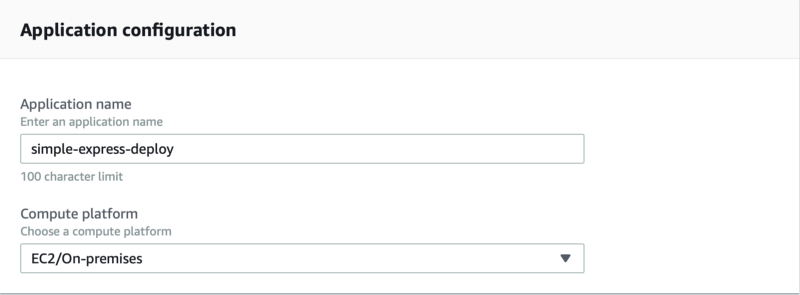
We’ll go ahead and give it a name of ‘simple-express-deploy’. We’ll select EC2/On-premises for our Compute platform. After we create it, you’ll notice we have a message saying ‘In order to create a new deployment, you must first create a deployment group.’ So, let’s click on ‘Create Deployment Group’ at the bottom of the page.

We can call our deployment group ‘simple-express-deployment-group’ and select the role that we just created earlier. Our deployment type will be ‘In-place’.

We’ll select ‘Amazon EC2 instances’ as our environment configuration. In order for CodeDeploy to find our EC2 instance, we had added tag while creating the instance. We’ll simply add the same key and value here.
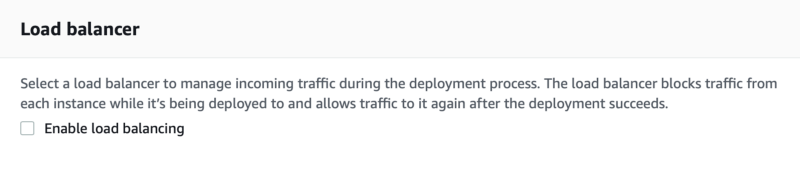
Okay so we probably won’t need a load balancer for our simple-express project so we are unchecking the ‘Enable load balancing’ option. Next, click on the create button. We have successfully created a deployment group for our CodeDeploy project.
Just like we had buildspec.yml file for CodeDeploy, we need appspec.yml file for CodeDeploy. It will contain all the instructions to carry out during our deploy process. Let’s create it in our project’s root folder where we had buildspec.yml file.
This file tells CodeDeploy to copy the build files to /home/ubuntu/simple-express folder in our server and execute start_server.sh script on ApplicationStart hook. You can find more details on appspec.yml file here.
We will create a new folder called scripts inside our application folder and add a file called ‘start_server.sh’ there. It will contain steps to restart our pm2 process.
Let’s make this file executable by executing the following command in our terminal inside our project folder.
All we need is now to link it to CodePipeline so that after the build is completed, it gets deployed to our EC2 server.
Let’s go back to our CodePipeline application. Right now we have only ‘Source’ and ‘Build’ stage setup. Let’s add ‘Deploy’ stage. For that, we need to click the ‘Edit’ button at the top of the page.
On the edit page, there is ‘Add stage’ button after each stage. Let’s click the one right after ‘Build’ stage. Let’s give a name for our new stage as ‘Deploy’. Once we have our ‘Deploy’ stage, we need to add action group.
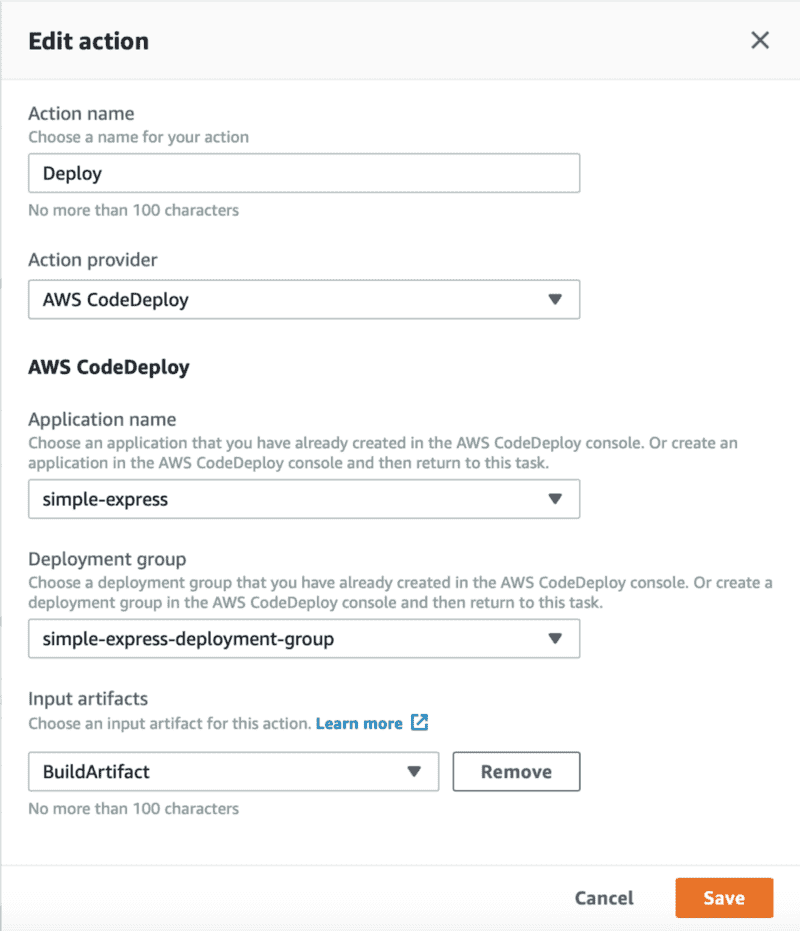
We’ll call our action as ‘Deploy’ and select ‘AWS CodeDeploy’ in Action provider. We need to select our CodeDeploy application and deployment group that we had created and choose ‘BuildArtifact’ as our input artifacts. Click ‘Save’ button and we have finally completed our setup.
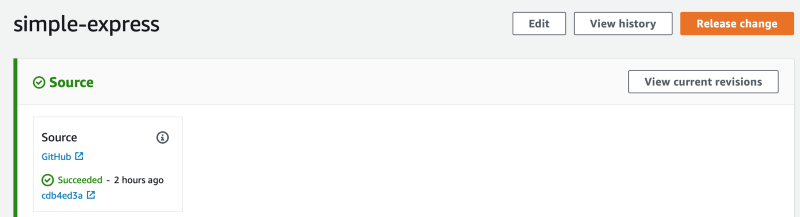
In order to test the deploy process, let’s commit our appspec.yml file that we had created. After pushing the change, you should again see ‘In progress’ and ‘Succeeded’ statuses in the CodePipeline stages.
Note: If your deploy stage fails, you can check the logs in your EC2 server using the command below:
Now any changes you make in the master branch, should be automatically built and deployed to the server. You can edit and customize the deployment process in CodePipeline to suit your needs.
For more articles on Live Chat, Automated Bots, SMS Messaging and Conversational Voice solutions, explore our blog.
Want to learn more about Botsplash platform? Write to us here.
To learn more about Botsplash click the button below to schedule a demo with our team.